What’s Hot

windows-8-command-prompt
There are some things you can only do from the command line, even on Windows. Some of these tools don’t have graphical equivalents, while others are just plain faster to use than their graphical interfaces.
We can’t possibly cover all the useful commands you can use in the Command Prompt or PowerShell here. We’ll be focusing on commands that should be useful even if you’re not a command-line person.

ipconfig – Quickly Find Your IP Address


You can find your IP address from the Control Panel, but this takes quite a few clicks. The ipconfig command is a fast way of determining your computer’s IP address and other information, such as the address of its default gateway — useful if you want to know the IP address of your router’s web interface.
To use the command, just type ipconfig into a Command Prompt window. You’ll see a list of all the network connections your computer is using. Look under Wireless LAN adapter if you’re connected to Wi-Fi or Ethernet adapter Local Area Connection if you’re connected to a wired network.
ipconfig-command[4]

ipconfig /flushdns – Flush Your DNS Resolver Cache

If you change your DNS server, the effects won’t necessarily take place immediately. Windows uses a cache that remembers DNS responses it’s received, saving time when you access the same addresses again in the future.
To ensure Windows is getting addresses from the new DNS servers instead of using old, cached entries, run the ipconfig /flushdns command after changing your DNS server.
flush-dns-resolver-cache

ping, tracert – Troubleshoot Network Connection Issues

If you’re experiencing issues connecting to a website or other network connection issues, Windows and other operating systems have some standard tools you can use to identify problems.
First, there’s the ping command. Type ping google.com and Windows will send packets to Google.com. Google will respond and let you know it’s received them. You’ll be able to see if any packets didn’t make it to Google.com — perhaps you’re experiencing packet loss — and how long it took you to hear back — perhaps the network is saturated and packets are taking a while to reach their destinations.
ping-command-on-windows
There’s also the tracert command, which traces the route it takes for a packet to reach a destination. For example, run tracert google.com and you’ll see the path your packet takes to reach Google. If you’re having issues connecting to a website, tracert can show you where the problem is occurring.
tracert-command-on-windows
For more information about using these commands, read our introduction to troubleshooting Internet connection problems.

shutdown – Create Shutdown Shortcuts on Windows 8

The shutdown command is particularly useful on Windows 8. You can use it to create your own shortcuts and place them on your Start screen or desktop, allowing you to more easily shut down Windows without digging through the charms bar or logging out first.
This command can also be used to restart your computer. On Windows 8, you can even use a special switch to restart your computer into the advanced startup options menu.
  • Shut Down: shutdown /s /t 0
  • Restart: shutdown /r /t 0
  • Restart Into Startup Options: shutdown /r /o
create-shut-down-shortcut-on-windows-8

recimg – Create Custom Recovery Images

The Refresh Your PC feature on Windows 8 allows you to restore your computer’s system state to its original state — either from a clean Windows install or as the computer came from its manufacturer. You can create your own custom recovery images, but this feature is hidden — you have to do it with the recimg command from a command line. This allows you to removemanufacturer-installed bloatware or add your favorite desktop programs to your recovery image.
For more information about using recimg, read our overview of everything you need to know about creating and using custom recovery images on Windows 8.

wbadmin start backup – Create System Recovery Images

Windows 8.1 removes the Windows 7 backup interface, which allowed you to create system backup images. These system images contain a complete snapshot of every single file on the system, so they’re different from Windows 8’s recovery images.
While the graphical interface has been removed, system administrators and geeks can still create system image backups by running the wbadmin start backup cmdlet in a PowerShell window. Unlike all the other commands here, this command-line tool must be run from within PowerShell, not the Command Prompt.

sfc /scannow – Scan System Files for Problems

Windows includes a system file checker tool that scans its system files and looks for problems. If system files are missing or corrupted, the system file checker will repair them. This may fix problems with some Windows systems.
To use this tool, open a Command Prompt window as Administrator and run the sfc /scannowcommand.
sfc-scannow

telnet – Connect to Telnet Servers

The telnet client isn’t installed by default. You’ll have to install it from the Control Panel. Once installed, you can use the telnet command to connect to telnet servers without installing any third-party software.
You should avoid using telnet if you can help it, but if you’re connected directly to a device and it requires that you use telnet to set something up — well, that’s what you have to do.
install-windows-telnet-client

cipher – Permanently Delete and Overwrite a Directory

The cipher command is mostly used for managing encryption, but it also has an option that will write garbage data to a drive, clearing its free space and ensuring no deleted file can be recovered. Deleted files normally stick around on disk unless you’re using a solid state drive. The cipher command effectively allows you to “wipe” a drive without installing any third-party tools.
To use the command, specify the drive you want to wipe like so:
ciper /w:C:\
cipher wipe drive

netstat -an – List Network Connections and Ports

The netstat command is particularly useful, displaying all sorts of network statistics when used with its various options. One of the most interesting variants of netstat is netstat -an, which will display a list of all open network connections on their computer, along with the port they’re using and the foreign IP address they’re connected to.
netstat-show-connections

This isn’t a comprehensive list of all the commands you might find useful, but we hope it’s given you some idea of the many powerful tools lurking under the surface. Linux isn’t the only operating system where users can benefit from learning some commands.

Some Useful Windows Commands You Should Know

windows-8-command-prompt
There are some things you can only do from the command line, even on Windows. Some of these tools don’t have graphical equivalents, while others are just plain faster to use than their graphical interfaces.
We can’t possibly cover all the useful commands you can use in the Command Prompt or PowerShell here. We’ll be focusing on commands that should be useful even if you’re not a command-line person.

ipconfig – Quickly Find Your IP Address


You can find your IP address from the Control Panel, but this takes quite a few clicks. The ipconfig command is a fast way of determining your computer’s IP address and other information, such as the address of its default gateway — useful if you want to know the IP address of your router’s web interface.
To use the command, just type ipconfig into a Command Prompt window. You’ll see a list of all the network connections your computer is using. Look under Wireless LAN adapter if you’re connected to Wi-Fi or Ethernet adapter Local Area Connection if you’re connected to a wired network.
ipconfig-command[4]

ipconfig /flushdns – Flush Your DNS Resolver Cache

If you change your DNS server, the effects won’t necessarily take place immediately. Windows uses a cache that remembers DNS responses it’s received, saving time when you access the same addresses again in the future.
To ensure Windows is getting addresses from the new DNS servers instead of using old, cached entries, run the ipconfig /flushdns command after changing your DNS server.
flush-dns-resolver-cache

ping, tracert – Troubleshoot Network Connection Issues

If you’re experiencing issues connecting to a website or other network connection issues, Windows and other operating systems have some standard tools you can use to identify problems.
First, there’s the ping command. Type ping google.com and Windows will send packets to Google.com. Google will respond and let you know it’s received them. You’ll be able to see if any packets didn’t make it to Google.com — perhaps you’re experiencing packet loss — and how long it took you to hear back — perhaps the network is saturated and packets are taking a while to reach their destinations.
ping-command-on-windows
There’s also the tracert command, which traces the route it takes for a packet to reach a destination. For example, run tracert google.com and you’ll see the path your packet takes to reach Google. If you’re having issues connecting to a website, tracert can show you where the problem is occurring.
tracert-command-on-windows
For more information about using these commands, read our introduction to troubleshooting Internet connection problems.

shutdown – Create Shutdown Shortcuts on Windows 8

The shutdown command is particularly useful on Windows 8. You can use it to create your own shortcuts and place them on your Start screen or desktop, allowing you to more easily shut down Windows without digging through the charms bar or logging out first.
This command can also be used to restart your computer. On Windows 8, you can even use a special switch to restart your computer into the advanced startup options menu.
  • Shut Down: shutdown /s /t 0
  • Restart: shutdown /r /t 0
  • Restart Into Startup Options: shutdown /r /o
create-shut-down-shortcut-on-windows-8

recimg – Create Custom Recovery Images

The Refresh Your PC feature on Windows 8 allows you to restore your computer’s system state to its original state — either from a clean Windows install or as the computer came from its manufacturer. You can create your own custom recovery images, but this feature is hidden — you have to do it with the recimg command from a command line. This allows you to removemanufacturer-installed bloatware or add your favorite desktop programs to your recovery image.
For more information about using recimg, read our overview of everything you need to know about creating and using custom recovery images on Windows 8.

wbadmin start backup – Create System Recovery Images

Windows 8.1 removes the Windows 7 backup interface, which allowed you to create system backup images. These system images contain a complete snapshot of every single file on the system, so they’re different from Windows 8’s recovery images.
While the graphical interface has been removed, system administrators and geeks can still create system image backups by running the wbadmin start backup cmdlet in a PowerShell window. Unlike all the other commands here, this command-line tool must be run from within PowerShell, not the Command Prompt.

sfc /scannow – Scan System Files for Problems

Windows includes a system file checker tool that scans its system files and looks for problems. If system files are missing or corrupted, the system file checker will repair them. This may fix problems with some Windows systems.
To use this tool, open a Command Prompt window as Administrator and run the sfc /scannowcommand.
sfc-scannow

telnet – Connect to Telnet Servers

The telnet client isn’t installed by default. You’ll have to install it from the Control Panel. Once installed, you can use the telnet command to connect to telnet servers without installing any third-party software.
You should avoid using telnet if you can help it, but if you’re connected directly to a device and it requires that you use telnet to set something up — well, that’s what you have to do.
install-windows-telnet-client

cipher – Permanently Delete and Overwrite a Directory

The cipher command is mostly used for managing encryption, but it also has an option that will write garbage data to a drive, clearing its free space and ensuring no deleted file can be recovered. Deleted files normally stick around on disk unless you’re using a solid state drive. The cipher command effectively allows you to “wipe” a drive without installing any third-party tools.
To use the command, specify the drive you want to wipe like so:
ciper /w:C:\
cipher wipe drive

netstat -an – List Network Connections and Ports

The netstat command is particularly useful, displaying all sorts of network statistics when used with its various options. One of the most interesting variants of netstat is netstat -an, which will display a list of all open network connections on their computer, along with the port they’re using and the foreign IP address they’re connected to.
netstat-show-connections

This isn’t a comprehensive list of all the commands you might find useful, but we hope it’s given you some idea of the many powerful tools lurking under the surface. Linux isn’t the only operating system where users can benefit from learning some commands.


As we have come to know that Bharti Airtel has launched its 4th Generation Mobile broadband service at Kolkata. As a part of Telecomtalk me also got invitation to be present there. Can call myself proud to be the witness of Country’s 1st and World’s 2nd (most probably in this band) TDD LTE(Time Division Duplex-Long Term Evolution) launch. This was inaugurated by Kapil Sibbal ,Hon’ble Minister of Communications and Information Technology, Government of India.
This launching ceremony was held on ITC Sonar and Airtel arranged a experience zone for us. After committed two consecutive speedtest , the result is:
At this initial stage the speed is being delivered at around 40mbps after that network upgradation it can be reached upto 100mbps at moving condition. So speed will not be dream so far. :)
for plan & pricing please click here.
Some pictures of that inauguration party(taken from my mobile and my friend(RDB)’s cam):


for more updates on Airtel 4G Stay tuned on: http://telecomtalk.info . :)

Airtel 4G TDD-LTE Speed Test at Kolkata


As we have come to know that Bharti Airtel has launched its 4th Generation Mobile broadband service at Kolkata. As a part of Telecomtalk me also got invitation to be present there. Can call myself proud to be the witness of Country’s 1st and World’s 2nd (most probably in this band) TDD LTE(Time Division Duplex-Long Term Evolution) launch. This was inaugurated by Kapil Sibbal ,Hon’ble Minister of Communications and Information Technology, Government of India.
This launching ceremony was held on ITC Sonar and Airtel arranged a experience zone for us. After committed two consecutive speedtest , the result is:
At this initial stage the speed is being delivered at around 40mbps after that network upgradation it can be reached upto 100mbps at moving condition. So speed will not be dream so far. :)
for plan & pricing please click here.
Some pictures of that inauguration party(taken from my mobile and my friend(RDB)’s cam):


for more updates on Airtel 4G Stay tuned on: http://telecomtalk.info . :)


BitTorrent is one of the most common protocols of transferring large amounts of data over the internet. It is a protocol is based on peer-to-peer file sharing. At any given moment, BitTorrent has, more active users then YouTube and Facebook combined according to Wikipedia.
It is capable to transfer a huge amount of data and because of that all users are trying to find how to speed up torrent downloads. The most popular BitTorrent client is uTorrent, and that is why we are going to show you how to speed up uTorrent.

Speed Up uTorrent

How to speed up uTorrent
uTorrent is the best BitTorrent client currently available.
These tips may be used on any other BitTorrent client, not just uTorrent. Note that we are not going to show you how to speed up internet – we are going to show you how to speed up uTorrent downloads.

Increase download speed

There are a few tricks which may show you how to increase download speed. This is going to speed up torrent download speed. You can speed up torrent downloads by following these tips:

Seed and peer ratio

This is a quite simple tip, but it is extremely important when deciding which torrent you are going to download from torrent download sites like The Pirate Bay.
Seed Peer Ratio
Always check out the best SE/LE ratio.
All these torrent download sites are going to show you the recent seed/peer ratio. So, it is important to look for torrents with best ratio. Usually torrents with more seeds compared to peers are better. So, 100 seeds and 50 peers is better than 1000 seeds (seeders) and 1000 peers (leechers).
Also, leave that “Use additional upload slots if upload speed < 90%” Checked.

Cap your download speed at 2x of your speed

Update: Thanks for Marko who send us this tip. I think it is worth to mention this because it helped me to go from 700 kb/s to 950kb/s on one torrent in a short time.
Go to Options > Preferences > Bandwidth and set Maximum download rate option to 2x of your maximum download speed. For my connection it would be 24576 kb/s instead of unlimited “0” setting.
Strange but seems this works on some torrents.

Use uTorrent 3.4+ Version

The uTorrent 3.4 version (and above) includes an update to the connection strategy, the optimize finding the fastest peers. Because of this, it is recommended to use the latest version of uTorrent client in order to speed up uTorrent.

Set DHT Rate

Hassan from Egypt sent me an email telling me that his download speed improved after changing default DHT Rating value (-1) to 2000. By changing this, I have noticed a small improvement in download speed on some torrents and it might work for you as well.
DHT should, in theory, increase your average transfer speeds, by potentially finding more seeds and peers than the other scraping methods.
To change your DHT Rate go to Preferences (CTRL+P) > Advanced and search for dht. When you find dht.rate in your advanced setting list, click on it and change it to 2 from -1 default value. Just like it is shown on the below screenshot:
DHT Rate
Change default dht.rate value to speed up your download speed.
You should limit DHT value especially when you have a lot of enabled torrents (which are downloading or uploading) and if you restart uTorrent frequently.

Set “High” Bandwidth Allocation

On some torrents you can force your client to get the better bandwidth allocation from the current seeders. To do that right-click on a torrent you wish to speed-up and go to [ Bandwidth Allocation > High ]:
Set Bandwidth Allocation
Set high bandwidth allocation to the selected torrent.
Wait a few minutes and you will probably see how torrent download speed is increasing.

Change to Random Port

Some firewalls actually may block ports that are accessed by your torrent client. This might drastically affect your download speed. To change this setting, go to [ Options > Preferences > Connection > Random Port ]:
Random Port uTorrent
Change uTorrent to access to a random port.
This will force uTorrent to connect to a random port. On some systems, this might highly improve your download speed with uTorrent.

Force Protocol Encryption

Force Protocol Encryption will not be beneficial to everyone. It can only make your transfers faster if your own ISP (service provider) actively slows down torrent transfers. However, you can try to force this option and see how it works for you.
To apply this option go to [Options > Preferences > BitTorrent]:
Force Protocol Encryption - Speed up uTorrent
Force protocol encryption for your uTorrent client to speed up download on some ISP.
Also make sure the check box for Allowing incoming legacy connections checked if not by default.
If after applying some of these settings above you experience bad performances, feel free to restore values to default.

How To Speed Up uTorrent.

BitTorrent is one of the most common protocols of transferring large amounts of data over the internet. It is a protocol is based on peer-to-peer file sharing. At any given moment, BitTorrent has, more active users then YouTube and Facebook combined according to Wikipedia.
It is capable to transfer a huge amount of data and because of that all users are trying to find how to speed up torrent downloads. The most popular BitTorrent client is uTorrent, and that is why we are going to show you how to speed up uTorrent.

Speed Up uTorrent

How to speed up uTorrent
uTorrent is the best BitTorrent client currently available.
These tips may be used on any other BitTorrent client, not just uTorrent. Note that we are not going to show you how to speed up internet – we are going to show you how to speed up uTorrent downloads.

Increase download speed

There are a few tricks which may show you how to increase download speed. This is going to speed up torrent download speed. You can speed up torrent downloads by following these tips:

Seed and peer ratio

This is a quite simple tip, but it is extremely important when deciding which torrent you are going to download from torrent download sites like The Pirate Bay.
Seed Peer Ratio
Always check out the best SE/LE ratio.
All these torrent download sites are going to show you the recent seed/peer ratio. So, it is important to look for torrents with best ratio. Usually torrents with more seeds compared to peers are better. So, 100 seeds and 50 peers is better than 1000 seeds (seeders) and 1000 peers (leechers).
Also, leave that “Use additional upload slots if upload speed < 90%” Checked.

Cap your download speed at 2x of your speed

Update: Thanks for Marko who send us this tip. I think it is worth to mention this because it helped me to go from 700 kb/s to 950kb/s on one torrent in a short time.
Go to Options > Preferences > Bandwidth and set Maximum download rate option to 2x of your maximum download speed. For my connection it would be 24576 kb/s instead of unlimited “0” setting.
Strange but seems this works on some torrents.

Use uTorrent 3.4+ Version

The uTorrent 3.4 version (and above) includes an update to the connection strategy, the optimize finding the fastest peers. Because of this, it is recommended to use the latest version of uTorrent client in order to speed up uTorrent.

Set DHT Rate

Hassan from Egypt sent me an email telling me that his download speed improved after changing default DHT Rating value (-1) to 2000. By changing this, I have noticed a small improvement in download speed on some torrents and it might work for you as well.
DHT should, in theory, increase your average transfer speeds, by potentially finding more seeds and peers than the other scraping methods.
To change your DHT Rate go to Preferences (CTRL+P) > Advanced and search for dht. When you find dht.rate in your advanced setting list, click on it and change it to 2 from -1 default value. Just like it is shown on the below screenshot:
DHT Rate
Change default dht.rate value to speed up your download speed.
You should limit DHT value especially when you have a lot of enabled torrents (which are downloading or uploading) and if you restart uTorrent frequently.

Set “High” Bandwidth Allocation

On some torrents you can force your client to get the better bandwidth allocation from the current seeders. To do that right-click on a torrent you wish to speed-up and go to [ Bandwidth Allocation > High ]:
Set Bandwidth Allocation
Set high bandwidth allocation to the selected torrent.
Wait a few minutes and you will probably see how torrent download speed is increasing.

Change to Random Port

Some firewalls actually may block ports that are accessed by your torrent client. This might drastically affect your download speed. To change this setting, go to [ Options > Preferences > Connection > Random Port ]:
Random Port uTorrent
Change uTorrent to access to a random port.
This will force uTorrent to connect to a random port. On some systems, this might highly improve your download speed with uTorrent.

Force Protocol Encryption

Force Protocol Encryption will not be beneficial to everyone. It can only make your transfers faster if your own ISP (service provider) actively slows down torrent transfers. However, you can try to force this option and see how it works for you.
To apply this option go to [Options > Preferences > BitTorrent]:
Force Protocol Encryption - Speed up uTorrent
Force protocol encryption for your uTorrent client to speed up download on some ISP.
Also make sure the check box for Allowing incoming legacy connections checked if not by default.
If after applying some of these settings above you experience bad performances, feel free to restore values to default.

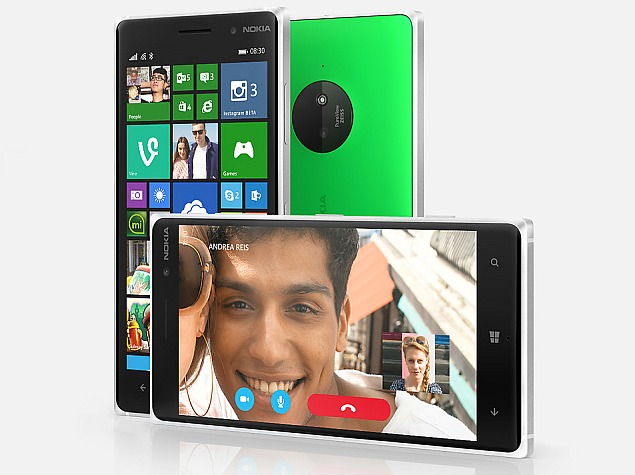
lumia_830_microsoft.jpg
Windows 10 Technical Preview for phones is now available to download. This is a pre-release version of Microsoft's upcoming mobile operating system. You should only download this if you want to try a new operating system on your Windows Phone device. Since this is beta software, many of your favourite apps may not work on it and upgrading to it right now is not recommended on your primary phone as the preview is still very much a work in progress.

If you have a spare Windows Phone device lying around or if you love playing around with latest (potentially buggy) builds of operating systems, then read on.
Supported devices
Currently, Microsoft says only six Lumia phones can download and install Windows 10 Technical Preview for phones. These are:
  • Lumia 630
  • Lumia 635
  • Lumia 636
  • Lumia 638
  • Lumia 730
  • Lumia 830
More phones will be supported in future builds, but for now only users of the phones listed above can try Windows 10 Technical Preview.
Backing up your data
This is beta software and hence can be very buggy. That's why we recommend that you make a complete backup of your Windows Phone first. We have written a detailed guide on how to backup and delete all data on your Windows Phone device and you must go follow all the steps listed there before proceeding.

Downloading and installing Windows 10 Technical Preview for phones
The process for downloading Windows 10 Technical Preview for phones is not too hard, especially if you know how to download and install Windows 10 Technical Preview on your PC. Follow these steps.

  1. Head to the Windows Insider page.
  2. Click Get Started to sign up for the programme.
  3. Enter your Outlook.com email address and password.
  4. Click Sign in.
  5. Read the terms of service, scroll down and check I accept the terms of this agreement (required).
  6. Click Submit.
  7. Scroll down and click Phone.
  8. Scroll down and click Get the preview.
  9. Download the Windows Insider app on your Windows Phone device.
  10. Open the app and sign in using your Microsoft account.
  11. Tap Get preview builds.
  12. Here you'll have to choose between receiving OS updates as they're released or after some bugs have been fixed. Tap Insider Fast to stay on the bleeding edge or pick Insider Slow if you'd like a slightly more reliable build.
  13. Take a look at all the warnings and then tap Accept.
Tap the Windows button on your phone.
  1. Go to Settings > Phone Update.
  2. Tap Check for updates.
Now you'll be able to download the latest Windows 10 builds for your smartphone. Tell us about your experience with Windows 10 on mobile and PC via the comments. For more tutorials, visit our How To section.

How to Install Windows 10 Technical Preview for Windows Phones.

lumia_830_microsoft.jpg
Windows 10 Technical Preview for phones is now available to download. This is a pre-release version of Microsoft's upcoming mobile operating system. You should only download this if you want to try a new operating system on your Windows Phone device. Since this is beta software, many of your favourite apps may not work on it and upgrading to it right now is not recommended on your primary phone as the preview is still very much a work in progress.

If you have a spare Windows Phone device lying around or if you love playing around with latest (potentially buggy) builds of operating systems, then read on.
Supported devices
Currently, Microsoft says only six Lumia phones can download and install Windows 10 Technical Preview for phones. These are:
  • Lumia 630
  • Lumia 635
  • Lumia 636
  • Lumia 638
  • Lumia 730
  • Lumia 830
More phones will be supported in future builds, but for now only users of the phones listed above can try Windows 10 Technical Preview.
Backing up your data
This is beta software and hence can be very buggy. That's why we recommend that you make a complete backup of your Windows Phone first. We have written a detailed guide on how to backup and delete all data on your Windows Phone device and you must go follow all the steps listed there before proceeding.

Downloading and installing Windows 10 Technical Preview for phones
The process for downloading Windows 10 Technical Preview for phones is not too hard, especially if you know how to download and install Windows 10 Technical Preview on your PC. Follow these steps.

  1. Head to the Windows Insider page.
  2. Click Get Started to sign up for the programme.
  3. Enter your Outlook.com email address and password.
  4. Click Sign in.
  5. Read the terms of service, scroll down and check I accept the terms of this agreement (required).
  6. Click Submit.
  7. Scroll down and click Phone.
  8. Scroll down and click Get the preview.
  9. Download the Windows Insider app on your Windows Phone device.
  10. Open the app and sign in using your Microsoft account.
  11. Tap Get preview builds.
  12. Here you'll have to choose between receiving OS updates as they're released or after some bugs have been fixed. Tap Insider Fast to stay on the bleeding edge or pick Insider Slow if you'd like a slightly more reliable build.
  13. Take a look at all the warnings and then tap Accept.
Tap the Windows button on your phone.
  1. Go to Settings > Phone Update.
  2. Tap Check for updates.
Now you'll be able to download the latest Windows 10 builds for your smartphone. Tell us about your experience with Windows 10 on mobile and PC via the comments. For more tutorials, visit our How To section.


615Dpr1ixaL._SL1000_
Mobile revolution and a corresponding rise of high definition camera in handheld devices developed an all encompassing selfies culture. Whether it is in our workplace or in school or in an event or gathering or in an outdoor tour, capturing selfies with robust smartphone camera or digital camera or camcorder is now a regular phenomenon. Capturing selfie video or photo just by placing the device along with the hand at a frontal distance is challenging for many people and often the quality of the output remains poor simply because of poor angle, untimely snap, tilted frame or simply unwanted jerk.

The selfie stick products are getting popular because they help holding the camera at perfect distance and angle without any jerk and make perfect timing of the snap by offering control to the user while facing the lens. Technically you cannot take a better selfie snap or video without a selfies stick. TabPow Universal Extendable Wireless Bluetooth Monopod is a high-quality selfie stick with an advanced feature set to further enhance your ease and perfection in taking selfies.  Some of the key features that place this selfies stick competitively ahead of other similar products are discussed below.

Nice and sturdy packaging

6112F8YU7rL._SL1000_
Buy here: Buy amazon
The whole setup comes in a nicely packed piece. Have a look at it and you will be able to make out the difference between the cheap selfie sticks available in the market and this one. The solid aluminum stainless steel body looks premium and attractive.

Manual 4 stage lock-on facility

51WmcjR2QtL
The stick is fairly extendable with easy 4 stage lock-on facility. Extending the stick as per your requirement and folding it to your bag makes it extremely convenient instrument for travelers. The foldable and extendable stick with 4 stage lock-on facility offers ease in maneuvering the camera lens as per your requirement of distance, angle and frame. With the ease of extending this stick the snaps naturally get better, meeting your expectation almost all the time.

Made of solid aluminum stainless steel

61PQ24sTR-L._SL1000_
This selfie stick is made of solid aluminum stainless steel material and hard enough to carry any camera or handheld device easily. It is ideal to be a companion of traveler as it is solid enough to withstand regular wear and tear.

Built-in Bluetooth remote shutter

61Z8dE0gmVL._SL1000_
This selfie stick comes with inbuilt Bluetooth remote shutter to take snap or record video by controlling the stick-held device from a distance. Thanks to this Bluetooth remote shutter taking selfie snaps or video is now an easy convenient job while everyone faces the lens.

Smartphone adjustable phone holder and Carabineer for an array of devices  

The strong and totally adjustable phone holder and Carabineer ensure safe holding of the device. The 4 stage lock-on stick can be tightened or loosened as per your requirement of flexibility while positioning the device in the phone holder. The phone holder and Carabineer supports a wide array of smartphones and camera devices including iPhone 6, iPhone 6 Plus, iPhone 5/5s/5c, iPhone 4/4s, iPod Touch, Samsung Galaxy S6/S5/S4, Galaxy Note 4/3, HTC, Motorola, LG, Sony, GoPro Camcorder and Camera and other Bluetooth-enabled smartphones.
Whether for offering ease and convenience in taking the best selfie snaps or for safe holding of the device, the new TabPow Expendable Monopod is equipped with an array of advanced features and functional benefits.


Source:-  technologyvista.in

You Need A Smart And Stylish Selfie Stick For High Quality Snaps

615Dpr1ixaL._SL1000_
Mobile revolution and a corresponding rise of high definition camera in handheld devices developed an all encompassing selfies culture. Whether it is in our workplace or in school or in an event or gathering or in an outdoor tour, capturing selfies with robust smartphone camera or digital camera or camcorder is now a regular phenomenon. Capturing selfie video or photo just by placing the device along with the hand at a frontal distance is challenging for many people and often the quality of the output remains poor simply because of poor angle, untimely snap, tilted frame or simply unwanted jerk.

The selfie stick products are getting popular because they help holding the camera at perfect distance and angle without any jerk and make perfect timing of the snap by offering control to the user while facing the lens. Technically you cannot take a better selfie snap or video without a selfies stick. TabPow Universal Extendable Wireless Bluetooth Monopod is a high-quality selfie stick with an advanced feature set to further enhance your ease and perfection in taking selfies.  Some of the key features that place this selfies stick competitively ahead of other similar products are discussed below.

Nice and sturdy packaging

6112F8YU7rL._SL1000_
Buy here: Buy amazon
The whole setup comes in a nicely packed piece. Have a look at it and you will be able to make out the difference between the cheap selfie sticks available in the market and this one. The solid aluminum stainless steel body looks premium and attractive.

Manual 4 stage lock-on facility

51WmcjR2QtL
The stick is fairly extendable with easy 4 stage lock-on facility. Extending the stick as per your requirement and folding it to your bag makes it extremely convenient instrument for travelers. The foldable and extendable stick with 4 stage lock-on facility offers ease in maneuvering the camera lens as per your requirement of distance, angle and frame. With the ease of extending this stick the snaps naturally get better, meeting your expectation almost all the time.

Made of solid aluminum stainless steel

61PQ24sTR-L._SL1000_
This selfie stick is made of solid aluminum stainless steel material and hard enough to carry any camera or handheld device easily. It is ideal to be a companion of traveler as it is solid enough to withstand regular wear and tear.

Built-in Bluetooth remote shutter

61Z8dE0gmVL._SL1000_
This selfie stick comes with inbuilt Bluetooth remote shutter to take snap or record video by controlling the stick-held device from a distance. Thanks to this Bluetooth remote shutter taking selfie snaps or video is now an easy convenient job while everyone faces the lens.

Smartphone adjustable phone holder and Carabineer for an array of devices  

The strong and totally adjustable phone holder and Carabineer ensure safe holding of the device. The 4 stage lock-on stick can be tightened or loosened as per your requirement of flexibility while positioning the device in the phone holder. The phone holder and Carabineer supports a wide array of smartphones and camera devices including iPhone 6, iPhone 6 Plus, iPhone 5/5s/5c, iPhone 4/4s, iPod Touch, Samsung Galaxy S6/S5/S4, Galaxy Note 4/3, HTC, Motorola, LG, Sony, GoPro Camcorder and Camera and other Bluetooth-enabled smartphones.
Whether for offering ease and convenience in taking the best selfie snaps or for safe holding of the device, the new TabPow Expendable Monopod is equipped with an array of advanced features and functional benefits.


Source:-  technologyvista.in


Privacy is one of the biggest concern to everyone these days, and to respect your privacy, few days ago Google enabled the option to download and delete your search history. And here again, they came up with one more thing, now you can stop google from tracking you.
Yeah you heard it right, you can stop Google from tracking your searches and browsing activity, places you go, information from your devices, your voice searches and commands, videos you search for on YouTube and Videos you watch on YouTube.
Here in this blog post, I am going to show you how can you stop Google from snooping in your data but let me tell you first, they claim that the data they collect is for enhancing the user experience on the web, so you need not to disable all the options. Here are the steps to disable Google tracker.
Step 1:
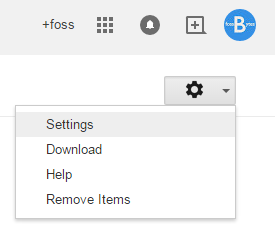
The first step in order to do this is to login to Google Web and App Activity PageNow click on Gear icon which will open some options.
google-web-app-activity-center
Step 2:
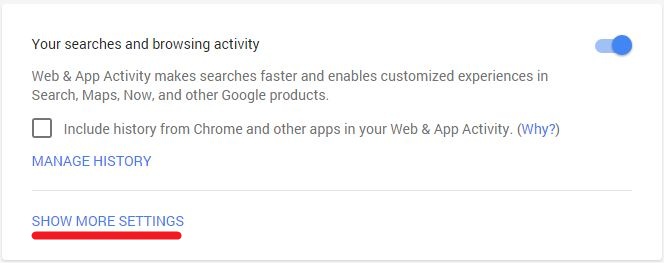
Now Click on Settings, it will open your accounts history settings. You can disable the searches and browsing activity from here or click on SHOW MORE SETTINGS to see other options.
google-web-app-activity-center-setting
Step 3:
Now it’s final step to stop Google from tracking you, all you need to do is to disable the option by clicking on the slide buttons located at the right side of every option. Now you can disable the options you want.
stop-google-tracking-me

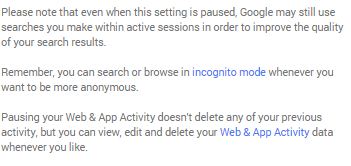
Now as you disabled Google from tracking you, you need not to worry about lots of things and search you perform on web. But yes, they can still look into your search for sometimes in order to improve the quality of your search results, or as they say. To go complete anonymous, incognito mode is a better way.
google-warning
If you like the post share it with your friends, family to make sure they can surf the web anonymously without having a fear of being snooped by Google.
For more security tips and news stay tuned with fossBytes.
Recommended:
Google Now Lets You Download Your Entire Search History, Here is How To Do ThisBest Alternatives to Tor Browser to Browse Anonymously

Source:- http://fossbytes.com/how-to-stop-google-from-tracking-you-in-few-simple-steps/

How to Stop Google From Tracking You in Few Simple Steps

Privacy is one of the biggest concern to everyone these days, and to respect your privacy, few days ago Google enabled the option to download and delete your search history. And here again, they came up with one more thing, now you can stop google from tracking you.
Yeah you heard it right, you can stop Google from tracking your searches and browsing activity, places you go, information from your devices, your voice searches and commands, videos you search for on YouTube and Videos you watch on YouTube.
Here in this blog post, I am going to show you how can you stop Google from snooping in your data but let me tell you first, they claim that the data they collect is for enhancing the user experience on the web, so you need not to disable all the options. Here are the steps to disable Google tracker.
Step 1:
The first step in order to do this is to login to Google Web and App Activity PageNow click on Gear icon which will open some options.
google-web-app-activity-center
Step 2:
Now Click on Settings, it will open your accounts history settings. You can disable the searches and browsing activity from here or click on SHOW MORE SETTINGS to see other options.
google-web-app-activity-center-setting
Step 3:
Now it’s final step to stop Google from tracking you, all you need to do is to disable the option by clicking on the slide buttons located at the right side of every option. Now you can disable the options you want.
stop-google-tracking-me

Now as you disabled Google from tracking you, you need not to worry about lots of things and search you perform on web. But yes, they can still look into your search for sometimes in order to improve the quality of your search results, or as they say. To go complete anonymous, incognito mode is a better way.
google-warning
If you like the post share it with your friends, family to make sure they can surf the web anonymously without having a fear of being snooped by Google.
For more security tips and news stay tuned with fossBytes.
Recommended:
Google Now Lets You Download Your Entire Search History, Here is How To Do ThisBest Alternatives to Tor Browser to Browse Anonymously

Source:- http://fossbytes.com/how-to-stop-google-from-tracking-you-in-few-simple-steps/

Name:- Monish Mondal (Orion)

 Position:- Developer  Author& Admin


Monish

hello there! my name is

Monish I grew up in a  village.  I’ve always embraced my geeky side, and from the moment I first picked up a Desktop.I was hooked. I started my own websites and online marketing and I guess that’s where my story begins.

About Monish
Beyond blogging and digital marketing , Monish Mondal is an entrepreneur at heart who has made his hobby turned passion. Becoming a blogger,  was the most important part of his journey.


Twitter                                     


Monish Mondal

Create your badge     


                                         ▀▄▀▄▀▄ ⓜⓞⓝⓘⓢⓗ ▄▀▄▀▄▀

Monish

Name:- Monish Mondal (Orion)

 Position:- Developer  Author& Admin


Monish

hello there! my name is

Monish I grew up in a  village.  I’ve always embraced my geeky side, and from the moment I first picked up a Desktop.I was hooked. I started my own websites and online marketing and I guess that’s where my story begins.

About Monish
Beyond blogging and digital marketing , Monish Mondal is an entrepreneur at heart who has made his hobby turned passion. Becoming a blogger,  was the most important part of his journey.


Twitter                                     


Monish Mondal

Create your badge     


                                         ▀▄▀▄▀▄ ⓜⓞⓝⓘⓢⓗ ▄▀▄▀▄▀